
So, if you have read my intro post when I started this blog like forever ago (Feb 7, 2021 to be exact), then you know that I’m super excited about a project called Atomizer. I’ve been slowly stringing you (my readers) along for the last few posts to build up some background so that I can reference it when I start talking about MPDC (Massively Parallel Distributed Computing).

When I built out Atomizer with a team of students (shout out to Matthew, Megan, and Nick) at the University of Illinois Springfield, we tested it with what is known as a Monte Carlo π simulation. The Monte Carlo π simulation showed that the system functioned as a distributed computing framework using a mix of node- and cluster-level parallelization. Monte Carlo π simulations are commonly used to explain how algorithms can be parallelized and distributed, so it worked well for those purposes.
Table Of Contents
What is a Monte Carlo π simulation?
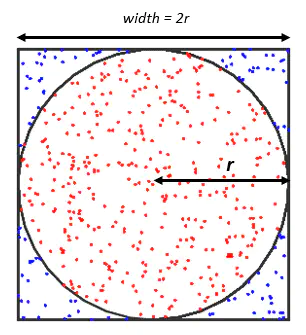
Assume that you had a square dartboard, and there was a circle inside that square that met the edges of the square (See figure to the right).
If you throw darts at the dart board then calculate the number of darts that landed in the circle compared to the total number of darts thrown, then you can estimate the value of π.
How is π estimated using this simulation?
π = 4 x ( # darts in circle / total # of tosses)
The equation for this simulation can be parallelized by making each throw of the dart its own process. It 1) calculates its “toss” or random x/y coordinates, 2) determines if the toss is in the circle, and 3) reports back to the original process. This algorithm allows for each toss to happen in its own “simulation.”
Once the parent process receives the results of all processes, it can then calculate the final π value.
Try It Out Yourself
So, in honor of π day 2021, I’ve set up Atomizer so you can try a Monte Carlo π simulation yourself!

Prerequisites:
Once you have the above applications installed on your system it’s super easy to run your own simulation using an Atomizer cluster.
Clone the Atomizer Test Agent Repository
From your terminal or git UI clone the following repo and move into the
atomizer-test-agent directory:
1git clone https://github.com/devnw/atomizer-test-agent
2
3cd ./atomizer-test-agent
Execute the Docker Compose File to Start the Cluster
Execute the following code in a terminal window from the atomizer-test-agent
directory. Figure 1 shows what this cluster looks like graphically.
NOTE: You can adjust the number of nodes
docker-composestarts by adjusting the--scale atomizer=3argument from 3 to whatever number you want.
1# Pull down the docker images from docker hub for this compose file
2docker-compose pull
3
4# Spin up the rabbitmq instance and 3 node Atomizer cluster (pre-loaded with
5# the Monte Carlo π simulation)
6docker-compose up --scale atomizer=3
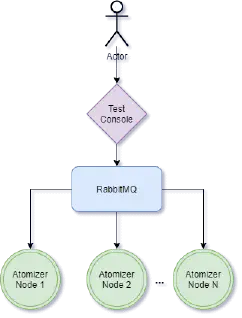 Figure 1: Example of a three node Atomizer cluster.
If docker-compose did not work, click here to visit the docker-compose
trouble shooting section.
NOTE: You may see messages similar to those below when executing this command. These can be ignored as it indicates that the RabbitMQ instance has not yet fully started listening on the network for the Atomizer nodes to connect to. If you see these kinds of messages, wait 30 seconds or so before moving on to the next step.
1# These are normal log messages to see which indicate
2# the Atomizer nodes are working on connecting to the
3# RabbitMQ instance
4
5waiting for host [atomrabbit:5672], attempt 3 failed
6waiting for host [atomrabbit:5672], attempt 4 failed
7waiting for host [atomrabbit:5672], attempt 5 failed
Interact with the Cluster through the Test Console
From another terminal window install the atomizer-test-console using
the following command specific to your version of Go:
1# For Go 1.16+
2go install atomizer.io/test-console@latest
3
4# For Go Versions 1.15 and below
5go get atomizer.io/test-console@latest
After executing these commands the test-console should have been installed by
the Go tool. From here execute the following command, which will connect to
the cluster:
1test-console
NOTE: If this doesn’t work, click here to visit the troubleshooting section.
The cluster uses default connection information for RabbitMQ so the
test-console should immediately connect and you should see something similar
to this:
1Enter Tosses: _
Enter the number of tosses you want the simulation to run and hit enter.
Results
The results of the simulation should be displayed fairly quickly depending on
the number of tosses you entered. Look at the test-console once the
calculation finishes, and it should show something similar to the example below:
1Enter Tosses: 500000
2Pi Estimation: 3.151984
Since Monte Carlo π is a simulation, it is important to point out that the π estimation that results are not going to be exact and will not be the same every time – even if the number of tosses is the same. Also, the π estimation will be more accurate the higher the number of tosses.
Fair warning though, the Atomizer system is intended to run on multiple systems not a singular system, and it will very quickly consume a large portion of your system’s CPU if the number of tosses is high.
What is happening under the covers?
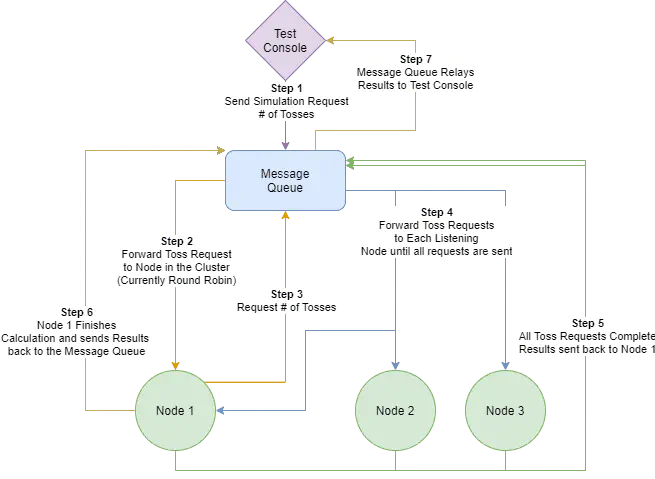 Figure 2: A step by step walkthrough of the Monte Carlo π simulation logic in the
cluster including the communication through the message queue
Figure 2: A step by step walkthrough of the Monte Carlo π simulation logic in the
cluster including the communication through the message queue
Monitoring the Cluster
The docker-compose file that is included in the atomizer-test-agent
repository has disabled logging. This was done to maximize the throughput of the
Atomizer cluster, since IO can greatly impede performance if it’s unnecessary
to the functionality of the application.
If you want to see what the cluster is doing, though, you can re-enable logging
by updating the docker-compose.yml file and adding - LOGLEVEL=INFO in the
environment section of the file like this:
1atomizer:
2        image: 'atomizer/test-agent:latest'
3        depends_on:
4                - "rabbit-mq"
5        environment:
6                - CONNECTIONSTRING=...
7                - QUEUE=...
8                - LOGLEVEL=INFO
This setting creates several listeners in the atomizer-test-agent which will
display events as they pass through the communication elements of the AMQP
system as well as the Atomizer engine itself. Once you’ve made this change, then
re-run the docker-compose
command to stand up your
cluster and re-run the simulation with the test-console.
NOTE: If you stop and re-start the cluster, you will need to stop and re-start the
test-consolein order to re-connect to the new RabbitMQ instance.
RabbitMQ Management Console
The docker-compose.yml file is set up to use a specific version of RabbitMQ
which exposes the RabbitMQ management console. If you want to view the
management console and see the messages as they go through RabbitMQ while
running a simulation, then navigate to
http://localhost:8080/
At the login screen enter the default credentials guest / guest and click
Login.
Under the Queues section you will see that
there is an atomizer queue, and, once you start a simulation, you will see a
couple more queues show up in the list, similar to what you see in Figure 3.
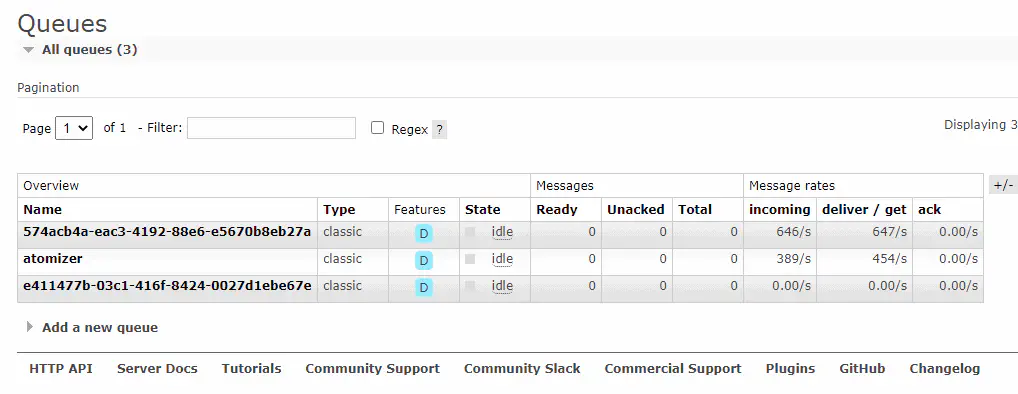 Figure 4: Example Queue List from RabbitMQ Running a Monte Carlo π Simulation.
Each of the three queues are important. The primary queue – where requests are
pulled from for each node – is the atomizer queue. Then, one of the other two
queues is the queue which the test-console listens to, and the third is the
one the montecarlopi atom listens to for the results of the toss simulations.
The coordination between these queues allows for messages to flow to the appropriate destinations so that results can be calculated and viewed by the user.
Cleanup
After you are done running the simulation, don’t forget to cleanup your environment by running the following commands:
1docker-compose stop
2docker-compose rm
Troubleshooting
Docker Compose Not Working
If the docker-compose command is not working as expected, here is a set of
docker commands you can run instead to stand up a three node cluster.
NOTE: The following commands add logging to
stdout. If you want to disable logging and improve performance, remove-e LOGLEVEL=INFOfrom the command.
 1# Setup a Docker network for the cluster to communicate on
 2docker network create atomizer_nw
 3
 4# Setup the RabbitMQ container instance
 5docker run -d \
 6  --rm=true \
 7  --hostname my-rabbit \
 8  --name some-rabbit
 9  -p 8080:15672 \
10  -p 5672:5672 \
11  --network=atomizer_nw \
12  rabbitmq:3-management
13
14# Setup each Atomizer node in a different terminal, or run each command
15# with the `-d` flag to ignore it's output
16
17docker run --rm=true \
18  -e CONNECTIONSTRING=amqp://guest:guest@some-rabbit:5672/ \
19  -e QUEUE=atomizer \
20  -e LOGLEVEL=INFO \
21  --network=atomizer_nw \
22  atomizer/test-agent:latest
23
24docker run --rm=true \
25  -e CONNECTIONSTRING=amqp://guest:guest@some-rabbit:5672/ \
26  -e QUEUE=atomizer \
27  -e LOGLEVEL=INFO \
28  --network=atomizer_nw \
29  atomizer/test-agent:latest
30
31docker run --rm=true \
32  -e CONNECTIONSTRING=amqp://guest:guest@some-rabbit:5672/ \
33  -e QUEUE=atomizer \
34  -e LOGLEVEL=INFO \
35  --network=atomizer_nw \
36  atomizer/test-agent:latest
Test Console Not Working
If the atomizer test-console did not work when you tried to run it, then pull
the repository down and build it directly using the following commands:
1git clone https://github.com/devnw/atomizer-test-console
2
3cd ./atomizer-test-console
4
5go build .
This will build the test-console and allow for direct execution.